You may contact us by phone or by email to support@migris.no or via the Migris request form. Our support phone is manned during normal office hours in Norway – from 08:00 to 16:00 (GMT+1), Monday – Friday. We always try to answer submitted requests within one business day.
#1 Describing problems for Migris support
In order to address your problems, we will need a description of the problem , a copy of your project file (subfixed .mirp in Migri directory), the corresponding log-file (subfixed .mirl). We may also need your model (see below). Also include the version number and operating system.
#2 Transferring a full Migri project
In order to send a Migri project to another user so that it can be run there, files in the Migri and db/ directories need to be extracted and moved into e.g. a zip archive.
This can be done using the following procedure:
1. Issue “internal Migri listfile” command in CommandsAndMessages window.
2. Load project
3. Open Migri explorer in the project db directory and locate the most recent db/listfile-data-time.csv csv file.
4. Right-click on the file in Migri explorer and select the "Extract project" option.
5. Migri will now create a subfolder "projectname_extr" in the db directory containing all the extracted files from the project.
6. The extracted project can now be copied to a different machine or a zip archive.
#4 Create a small Migri project from a larger geometry
There are two simple procedures that can be used to make small geometrical models that are confined to a small area within an existing Migri geometry.
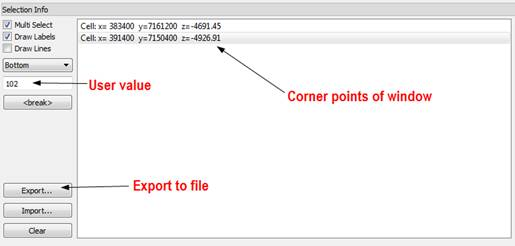
The first method involves digitizing two points that define a rectangular area within the SelectionInfo window and giving these two points a unique user value (e.g. 102). Save the digitized points to the file db/migri-windows.csv by clicking the “Export...” button.

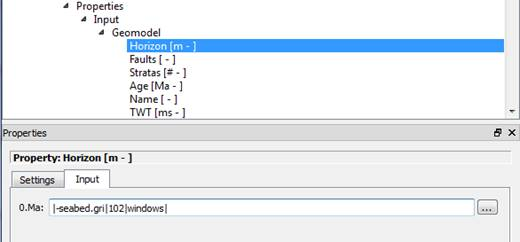
Next, go to Properties/Input/Geomodel/Horizon for the seabed. If the input for this horizon is e.g. “-seabed.gri”, change it to “|-seabed.gri|102|windows|”.Save the project to a new file with File/SaveProjectAs. Close the project and doFile/GenerateProject/CreateGeometries and reload the project.

The second method allows extracting a drainage area from the model. After simulating to e.g. 0 Ma, pick a point in the trap you want to work with. UseDrainage/PickDrainage to pick the drainage area of that trap. Use e.g.SpillDrainage if you want to add the spill areas, or DepthDrainage if you want to include only the areas that drain or spill into the trap.
Next, use SavePropertyAsGrid via the right mouse button while pointing at the model in the 3D view and save the file as e.g. “mydrainage.gri”. Thereafter go toProperties/Input/Geomodel/Horizon for the seabed. If the input for this horizon is “-seabed.gri”, change it to “|-seabed.gri| mydrainage.gri |intersect|”. Next, you save the project with File/SaveProjectAs. Then close the project and doFile/GenerateProject/CreateGeometries and load the project.

Comments